You can let the script grab an image of your region from the SecondLife servers. But if you have a lot of
sky boxes the ground view may be hidden, so you may need to make one yourself.
This will require some image editing skills and software.
Using Your Own Map Image
To make your own map image from a single photograph:
Fly your avatar to 128, 128, 500 with your draw distance to 700 meters
Set your graphics mode to High, but turn off "Shadows" and "Atmospheric Shaders"
Try a lighting preset such as "CaIWL" that provides even lighting. You can also experiment with the sun position controls in Personal Lighting
If your region has a lot of large trees that are hiding details, you may want to temporarily de-render them.
Right click on the tree or objects and select: More-> More -> Derender -> Temporary.
The trees will reappear next time you log in.
Open the SL Camera and uncheck "Constrain Proportions". Then set the Width x Height the highest pixel size allowed. (For me that is 7680)
Take picture trying to point as directly down as possible.
If most of your structures are low, you can experiment with taking the photo at more of an angle to give buildings a little 3D look.
Save the picture to your computer
Now you need an image editor...
Crop the image to your region or parcel boundary.
Adjust the image brightness and contrast settings to provide the best detail
Save this as your master version and make a copy.
Add text to the copy of your image and save it.
Now make a copy of the image with text and edit it.
Now reduce the image to a size that SL will accept.
The maximum is 2024 (in any direction), but if your image does not have a lot of details, you can use 1024. Less than that and text can be degraded.
Sharpen this image (sharpening is usually needed anytime you reduce the resolution of an image).
Save it as a JPG at the "best" quality setting and upload to SL
Now you can:
Copy the Texture into the Region Map object's contents and specify the name in the Config notecard.
Or, put the UUID of the Texture (right click on it in your inventory), and put that in the Config notecard.
I Only Have a Partial Region
If you own a half or quarter of a region and still want to use the default (full region) SL map, here's how:
You will need to specify Texture Scale and Offsets.
The configuration keyword to do this is SCALE&OFFSET
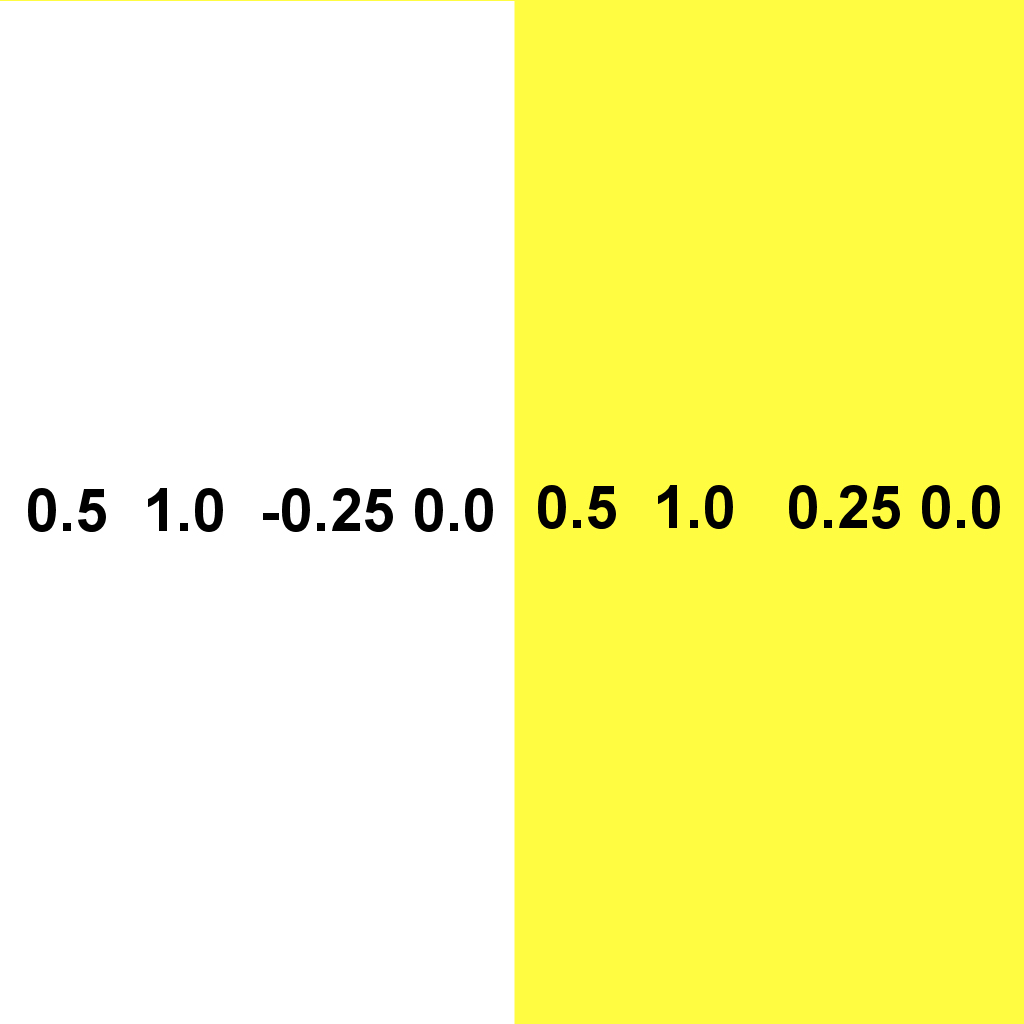
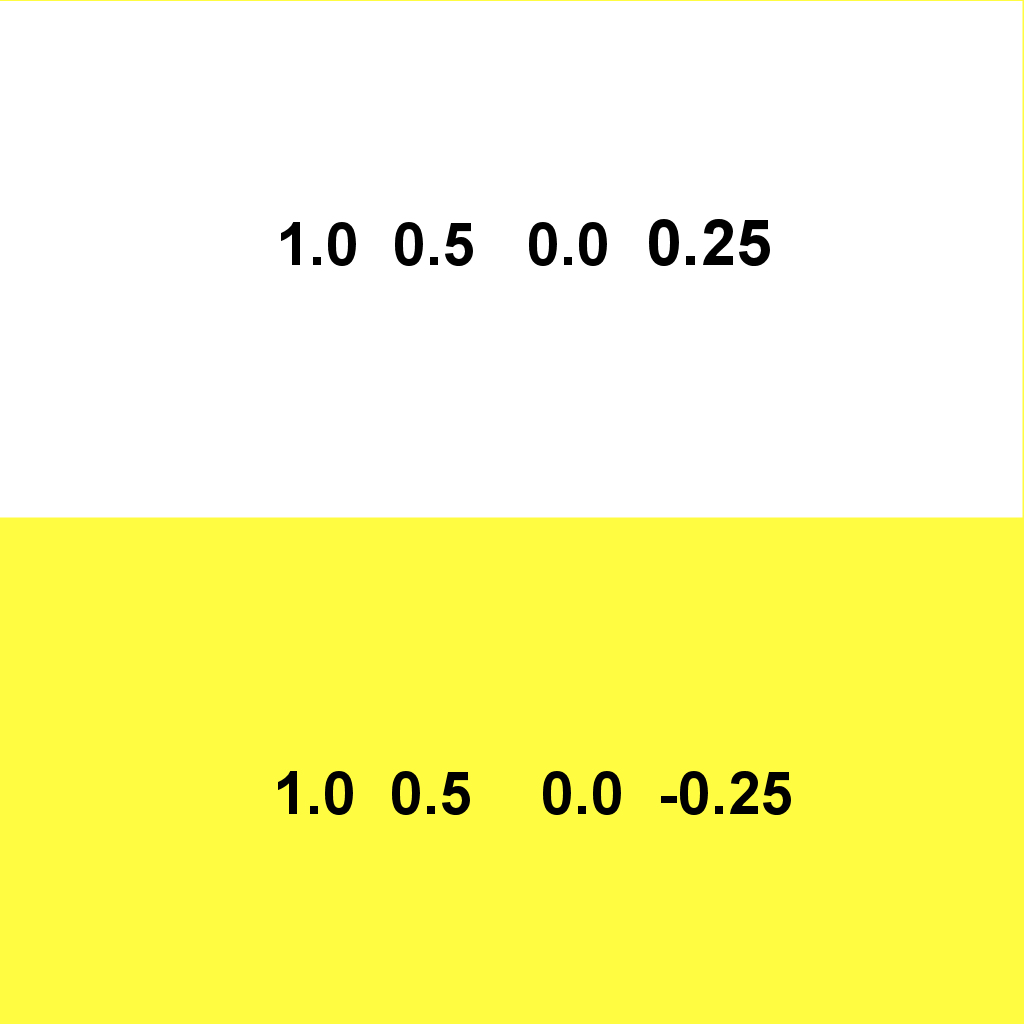
    SCALE&OFFSET     H-Scale V-Scale   H-Offset  V-Offset
    SCALE&OFFSET      1.0      1.0       0.0       0.0     <-- these are the default values for a full region map
If your parcel size and location matches one of the examples provided below, just put those values in the configuration notecard.
Otherwise,
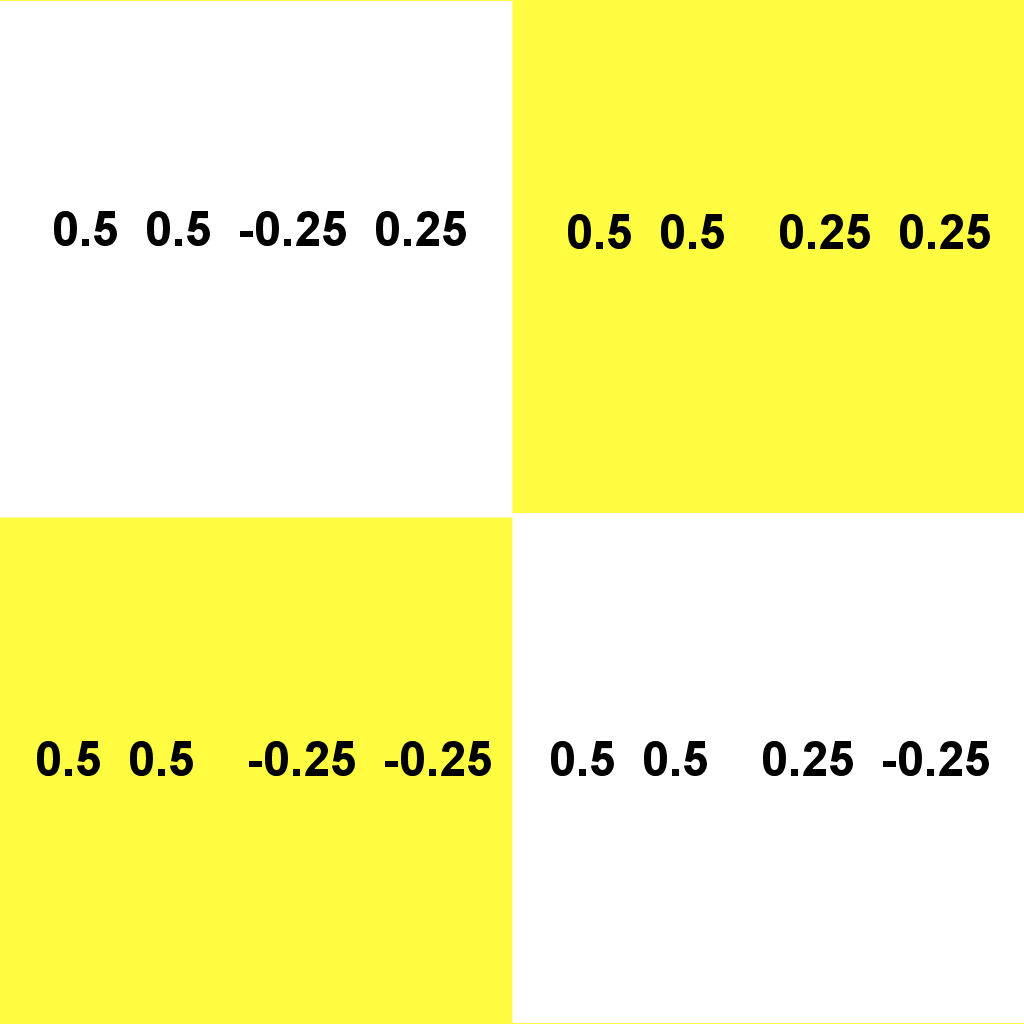
you will need to play with the object editor and discover what values work for your parcel size and location.
The example image below shows the editor values with the lower left quarter of a region being displayed.
In general, lower Scale values enlarge the image, and the offset values shift the texture left/right and up/down.
(Click image to enlarge)
If your parcel is not square you will need to change the parameters for the ASPECT keyword to match.
ASPECT width height is used to make the map base match the width and height of the texture.
So if you have the left or right half of a region, use "ASPECT 1 2". If you have a top or bottom half of a region, use "ASPECT 2 1"
Areas of interest are defined a notecard with "CONFIG" as the first part of the notecard name.
You can add any text you want after "CONFIG"
The script has a build in tool to help you define these areas and provide you with the correctly formatted line to be added to the notecard.
To activate this tool:
Point to the lower left corner of the area on the map and touch and hold for more than 2 seconds.
If you have sound on, you will hear a beep when the long touch has been recognized.
Not touch the Upper Right corner of the touch area
A pop-up box will allow you to enter a text description where you can name the area and provide a little information about it.
This descriptive text appears above the Map Pointer when that area is touched. It is limited to 254 characters.
You can cause a line break by including the 'newline' escape sequence "\n"
First line\nSecondLIne.
Note that SL automatically collapses multiple newlines into a single blank line, so to provide a blank line use" "\n \n" instead of "\n\n"
After entering the text, click Submit and a line will be printed to the chat window that you can then add to the CONFIG notecard
AREA 00~<0.99,0.52,0>~<0.89,0.64,0>~Landing Zone~some_color_name
That "00" after AREA will become a reference number if you decide to use the optional Directory prim
The color name is optional. if not is specified, WHITE or a default (specified with the "DEFAULT_COLOR" keyword), will be used.
But you can use any color by using the scripting vector notation for RGB : <1.0, 0.0, 0.5>
( See for a detailed explanation)
Overlapping Areas
Suppose you have areas that are inside a larger area. In the example config file, (area 40), is a large area is labeled "The Quad".
This area encompasses several buildings with their individual AREA definitions.
As you define these smaller areas, position them in the config notecard in the reverse order you want them to appear over the pointer.
You can have have up to four nested areas.
You Are Here!
If no one touches the map for a minute, the pointer will move to the first area defined in the CONFIG file.
By placing the Map at this location, you can create a "You Are Here! pointer.
Try using the following for the first area defined: "You Are Here!n \nLanding Zone\n \nTouch the map to\nlearn about an area"
This will appear over the pointer as:
        You Are Here!

        Landing Zone

        Touch the map to
        learn about an area.
Resizing for Areas Other than Regions
If your area is not a square region or parcel, you will want to re-size the base to match the proportions of the map image.
You will need to create your own single image of your land in this case.
So if you have half a region for example:
Edit the CONFIG notecard and change the ASPECT ratio keyword. You can use the pixel size of the texture as "ASPECT 512 256" for a
texture that is twice as wide as it is tall.
Edit the Map object and stretch the base to the width you want.
Any time you resize the base, the Map object's height will be adjusted so the width and height match the specified aspect ratio.
To use a Directory Panel, you will probably want to create a texture that is 1024 to 2048 pixels wide so the text looks good.
(Use the same procedures as for making your own map).
Once you have created the texture, copy it into the Map's contents and reference the name in the Config file with the DIRECTORY keyword.
The Texture will automatically be adjusted to fill the size of the Directory prim.
The rest of the configuration is just like defining the AREA locations except that you are
touching the lower left and upper right corners encompassing the place names on the directory prim.
This will print a line like:
FIND ??~<0.67,0.36,0>~<0.84,0.40,0>
The question marks are replaced with a reference number that identifies an previously defined AREA
So to link the two you would have these lines in the configuration notecard:
AREA 30~<0.60,0.23,0>~<0.66,0.27,0>~Market~YELLOW
 ...
 FIND 30~<0.67,0.36,0>~<0.84,0.40,0>
If you use an ID in a FIND that is not already defined with an AREA keyword, you will see a warning message.