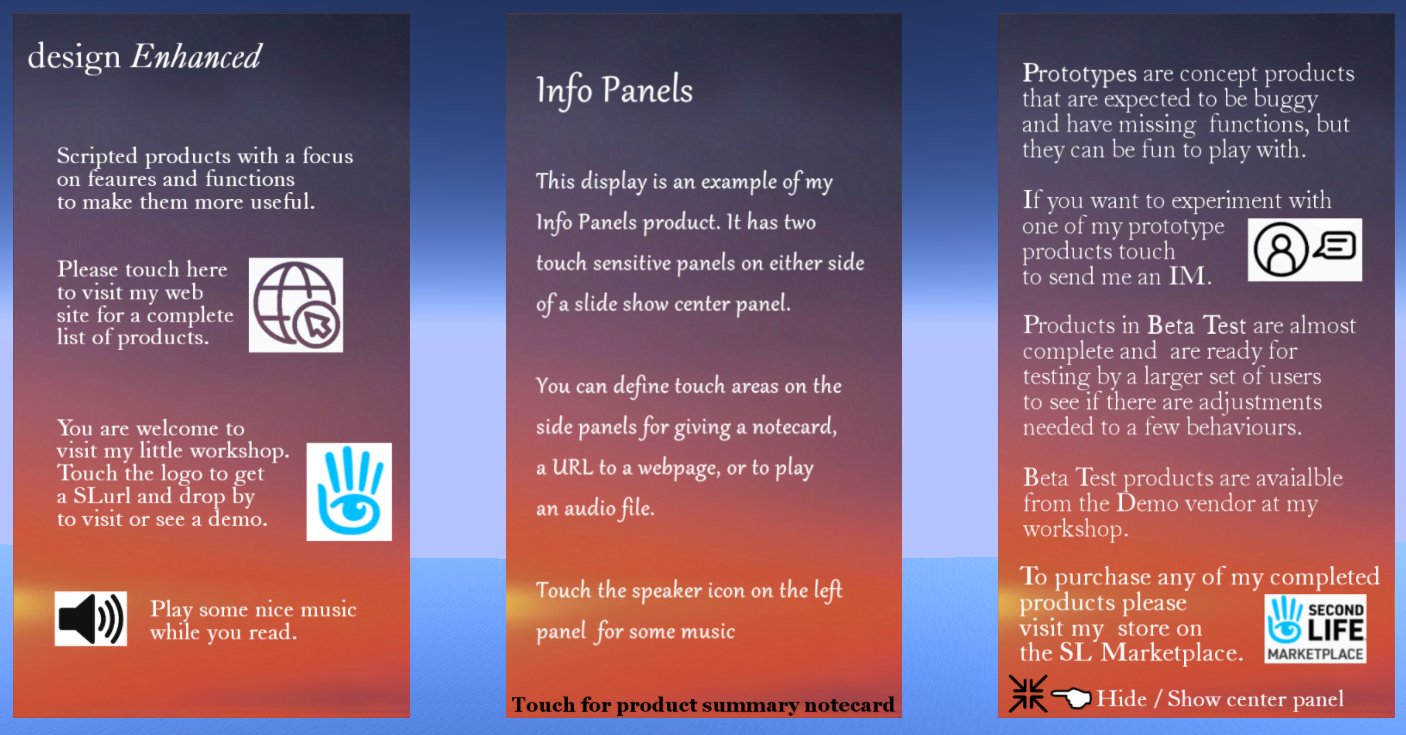
This product can be used as a HUD to be handed out, or resized to become an in-world display.
There are three panels. The left and right panels each have a static texture with information.
They can also be configured with touch areas to reference a webpage, a SLurl, give a notecard, or play an sound file.
The center panel provides a slide show with as many images as you want to add to the object's contents
The Product Key Box
Before you can work on this product and customize it, you must rezz the Product Key box nearby.
This product is designed for purchasers to modify and then transfer to a new owner as a HUD.
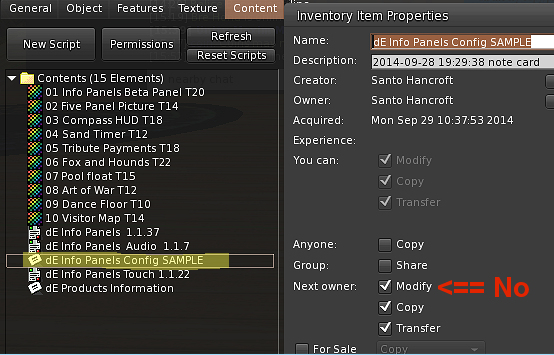
But before the Info Panels object is transferred to another owner
the Next Owner permissions must be set to No Modify on both the object AND the configuration notecard.
If these permissions are not changed, the next owner will just get 3 pretty black blocks to look at and some
annoying messages about the product not being correctly configured.
The Product Key must also be nearby if you want to rezz the panels on your land for visitors to see
Sharing with others
While you can rez the panels on your land (with the Product Key also rezzed). This is intended to be given away to visitors or customers as a HUD.
In order to do this, you must change the permissions on the Info Panels object and the configuration notecard.
Until you do, you will see messages each time the panels reset.
Here's how to do this: (Click images to expand)
Rez the panels on the ground with the product key nearby.
Edit the object
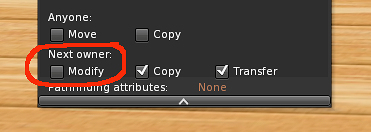
At the bottom of the General tab, under "Next owner:" uncheck Modify. If you want to people to give this to others, you can leave Copy and Transfer checked.
Now on the Content tab, right click on the config notecard and select Properties
Again uncheck Modify.
The scripts will automatically re-check permissions and the panels will then initialize for you to work on them.
Once permissions are correct for sharing with others, "Share" will be added to the object name.
This lets you know when you take in back into your inventory that this is your shareable copy.
You will also want to specify the name of the version you want to share as a HUD with the OBJECT_NAME config keyword.
Also, check that all included textures, notecards and sound files are copy/transfer as well.
Tip: If you find that you can share it with someone, but then they can not re-share it, it is probably because you have included items in your contents that are either "No Copy" or "No Transfer".
Configuration
The configuration notecard is named CONFIG (followed by whatever you want).
Each time you modify this notecard the product will automatically reset. Here are the Keyword and parameters.
The supplied notecard has example of each of these at the bottom.
Keywords and Parameters
Keywords and all parameters are separated by one or more spaces.
# (Pound Sign)
The pound sign (followed by a space), makes a line a comment
OBJECT_NAME
This is the name of the object you will want to give to customers. How it will appear in their inventory.
The panels must be rezzed for this name change to occur.
If you are just using the panels as a rezzed display, you don't have to use this keyword.
ASPECT_RATIO
This is the ratio of width and height expressed as width:height. Examples as 4:3 or 16:9.
For the panels to display on a HUD, the configuration file used 9:16 to create a vertical smartphone look for each panel
To size the panels, you adjust the height and the width will be adjusted for this Aspect Ratio
INTERVAL
This is the default time in seconds that each image on the center panel will be shown before cycling to the next.
But, as it is likely that you will want some images to be shown for longer or shorter times, you can specify a time for each image.
Just add " Tnn" to the end of the image name such as: "Image with a lot of text T25". And this image will be shown for 25 seconds.
TEST_INTERVAL
Uncomment this keyword for testing when you want to speed up the slide show in the center panel.
The seconds given here will over-ride the default INTERVAL keyword and any " Tnn" suffix on individual textures.
See also TOUCH CENTER FW/BW below
LEFT or RIGHT
These Keywords specify the texture to be shown on the left and right Panels.
You must use the UUID (key) of a texture that is in your inventory. Such as:
RIGHT aab71315-96b2-ed27-c5d1-516989aa89f4 LEFT 6bcedb52-2ea5-69f0-c989-f49ad285057e
To get the UUID: right click on the texture in your inventory and find the "Copy Asset UUID".
OVERLAY
This allows you to specify the UUID of a static texture to be displayed in front of the slide show panel.
By placing your brand name or logo on this texture (with a transparent background), each image in your slide show will have your logo shown in the same place.
This avoids needing to add your logo to each image in an editor, (and also avoids alignment issues that could make the logo shift slightly on each image).
If you don't want to use this, just comment it out with a pound sign --> # OVERLAY
Also remember that the overlay image must be saved as a PNG with transparency enabled.
The slide show textures
These textures are not specified in the CONFIG notecard. Just drop them into the object's Contents
TOUCH LEFT or TOUCH RIGHT or TOUCH CENTER
These specify touch areas on the panels that will trigger presentation of a URL, give a notecard, or play a sound file. The Keywords are:
"TOUCH LEFT URLcoordinate_numbers " followed by a URL or a SLurl to be presented to the viewer in local chat.
"TOUCH LEFT IMcoordinate_numbers " followed by any message you want send as an Instant Message.
"TOUCH LEFT NCcoordinate_numbers " followed by the name of a notecard in the object's contents.
"TOUCH LEFT TOGGLEcoordinate_numbers " (See bottom of this page for details)
"TOUCH LEFT AUDIOcoordinate_numbersLength" is followed by one or more sound files to be played.
These sound files can be the name of sound files in the object contents or the UUID of sound file in your inventory.
The sound file names must not have spaces in them.
Length is the length of each sound file. If you have a single file, just put "30" here.
Sound files can be a maximum of 30 seconds long. To play more than one in sequence, (and without noticeable gaps),
make them exactly 30 seconds. (The last one can be less than 30 seconds.)
Note that the limit for sounds files used to be 10 seconds. So if you are using older files of that length, specify a
length of 10 seconds.
If you only have one sound file, just specify "30".
"TOUCH CENTER PAUSEcoordinate_numbers "
will pause the center panel slideshow. Touching the same place will resume.
The sample CONFIG file places this at the top edge of the center panel. This only works on the center panel.
"TOUCH CENTER FWcoordinate_numbers "
"TOUCH CENTER BWcoordinate_numbers "
FW & BW (Forward and Backward), are more for your testing than use by your visitors.
They allow you to step through the slideshow without waiting for each image to timeout.
The sample config file places FW and BW along the left and right edge of the center panel
FW and BW only work on the center panel. This is an alternative testing method for using the TEST_INTERVAL keyword.
The coordinate_numbers are two groups of 2 numbers (between 0.0 and 1.0), that specify the touch area on the panel.
The first set of two defines the lower left corner on the texture. The second set defines the upper right corner of the touch area.
So a configuration to present the viewer with a URL to a webpage, when the center of the right panel is touched, looks like this:
TOUCH RIGHT URL 0.4 0.4 0.6 0.6 https://your-domain.com
For a SL contact URL use: secondlife:///app/agent/your_UUID_or_key_here/about
To reference a parcel use a SLurl such as: http://maps.secondlife.com/secondlife/Fietzo/231/116/92
You can get the SLurl for a location from a button on the world map.
To have someone send you an email, use the IM option:
"TOUCH LEFT IM 0.8 0.4 0.9 0.6 your_ID@someserver.com"
A configuration to play two sound files in sequence, when the Upper left corner of the left panel is touched, looks like this:
TOUCH LEFT AUDIO 0.0 0.8 0.2 1.0 30 sound_file_1 sound_file_2
A configuration to give the person touching the panel a notecard, when the lower right corner of the Center panel is touched, looks like this:
TOUCH CENTER NC 0.8 0.0 1.0 0.2 name_of_notecard
HIDE_CENTER_METHOD
The center panel slide show can be hidden by 1) moving it behind the left panel; or 2) making it transparent.
HIDE_CENTER_METHOD 1 Moves the center panels behind the left panel, allowing the user to touch objects between the left and right panels.
You will need to add a TOGGLE touch area definition on one of the side panels
HIDE_CENTER_METHOD 2 Makes the center panels transparent (except for the Overlay texture) allowing the user to see what is behind them
You can put a TOGGLE touch area on the Overlay Texture which will still be visible
The reason for this is for when you provide it as a HUD and want the user to be able to get the center panel out of the way to view the world.
An example would be a performer that has song lists on the left and right panels and contact/booking info on the center.
Hiding the center panel allows them to see more of the world like keeping the song lists up. If you want them to be able to interact with the world, use Hide Method 1.
EOC
The EOC (End Of Config) keyword tells the script to stop reading the notecard. You can add notes after this.
More about the TOGGLE keyword
The TOGGLE touch area allows your users to hide or show the center panel when it is attached as a HUD.
An example might be when a DJ has bio and booking information in the center panel, and song lists on the left and right.
By defining a Show/Hide button, the center panel can be hidden allowing better visibility of the world in the central part
of the user's screen.
There are two ways to "Hide" this center panel and they are controlled by the HIDE_CENTER_METHOD keyword described above.
More About Audio Files
SL can only play audio files that are a maximum of 30 seconds long. But you can chain them back-to-back to play longer audio clips.
Use an audio editor to chop your audio file into segments of exactly 30 seconds in length (except for the last one in the series) **
Name them MySong-1, MySong-2, etc
Upload them to SL
You can specify them in two ways:
Put the UUID of the files in this notecard.
Put the names of the files in this notecard and place the files in the contents of the Panels object. (but make sure the file names do not include any spaces).
In either case, use a space to separate them. And therefore filenames must not have internal spaces
** Yes there is a SL function to queue audio files of different lengths to play one after another,
but there can be an audible gap in between them.
Playing WAV files exactly 30 seconds in length sequentially seems to improve this.
Touch Area Assistant
The Info Panels have a built in tool to aid in constructing the TOUCH configuration lines.
Touch areas are defined by their lower left and upper right corners.
Touch and Hold for 3 seconds at the location of the lower left corner where you want to define a touch area
If you have sound enabled, you will hear a beep when the long touch has been recognized.
Now touch the upper right corner of the touch area.
Three lines will be printed in local chat with a template for the touch area configuration.
Just copy and paste into the configuration notecard and then add the URL, notecard name, or sound file name(s)
Permissions: Copy, Modify, Transfer, but the Next Owner permissions must be changed to No Modify before distributing.
 Here's how to do this: (Click images to expand)