This page explains how to apply textures to doors. You will also want to view:
Editing Controls for Texture Appearance
There are several controls in the Edit panel -> Texture tool to change how a texture is applied to a face of a prim.
- Texture Repeats
- Controls how many times the texture is repeated across the face.
- To apply the whole texture the repeat values should be 1.0.
- For painting a face with a texture such as a brick wall, the repeat value will be greater than one. (A good starting point guess is to set the horizontal and vertical repeats
to the same number as the X and Y size of the face.)
- If you only want a portion of the texture to be visible, us a repeat value less than one.
- Texture Offsets
- The offset value is use the shift the texture up/down or left/righ on the prim face.
When combined with Texture Repeat values of less than 1.0, you can display only a small portion of the texture on a face.
Texture Repeats and Offsets for Doors
Texture repeats and offsets determine how a texture is applied to a face of a prim. For this discussion it is
assumed that the texture will be applied to a door design to swing as if on hinges. See Making Your Own Doors to learn
how to shape the a door prim.
Normally when applying a texture to a prim face you will specify the Repeats / Face both to be 1.0; meaning to spread the extire texture across the face.
But for folded prims, we end up seeing only half the texture.
 |
|
For swinging doors, which are actually folded over on top of themselves, the actual width of the prim is twice what it appears to be.
And so we want to apply the texture to half of the face. This means the horizontal repeat with be 2.0.
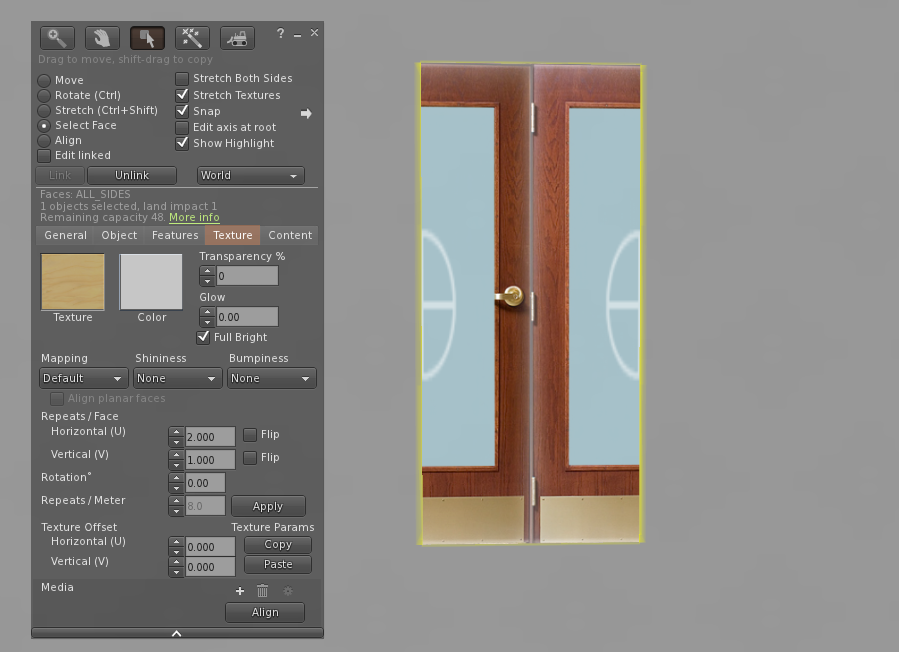 |
But now the texture is not aligned properly on the face of the prim.
|
With the outside edge of the texture running down the middle of the face, this is corrected by changing the
Horizontal Texture Offset to be to 0.50.
 |
|
Another thing to notice is that in the upper part of the panel, the button for Select Face has been chosen. If you fail to select the specific face to work with, your texture setting will be applied to all faces and that will not always be what you want.
Set the Flip check boxes as needed to make put hinge side of the texture on proper side of the door.
 |
NOTE: All of the door objects included in Design Enhanced Kits are folded prims and this procedure should be used to apply textures to them..
Textures for the Door Edges
The edges of the door will be either the default plywood texture of possibly the door texture you appled to front and back of the door.
If you have used a generic wood texture for the door, then apply the same texture to the edge. If your door texture is more complex then try using
the default plywood texture for the edges and tint it to match the door texture.
To match the yellow tint of the plywood texture to your door you will first need to know the color setting (Red, Green, and Blue) of the door.
To find these values
- Turn on Show Color Under Cursor from the Develop menu: Develop ->Show Cnsoles > Show Color under Cursor.
When selected, four numbers (in white) will appear at the bottom right of tyour screen. The first three are the RGB values under the cursor.
- Choose a color from the door texture. As you may have many shades choose one a medium dark color and write the numbers down. (Area 1 in the figure below)
- Your task now is to make the color of the plywood to match those numbers.
- To start with you can just put the target RGB numbers into the color select panel for the plywood. But as the plywood already has a yellow color, you will
need to make adjustments.
- Move the cursor into the door edge (Area 2 in the figure) and compare the current colors to the ones you wrote down for the door face.
- Adjust the RGB values for the plywood edge or down until the edge color matches the door.
Note if you are using a door that is a very pale color or white, you will not be able to make the plywood texture color match and will need to use another texture for the edge.
